
Cooking can release grease, smoke, and other particles into the air, which are caught by the filters in cooker hoods. Vented hoods exhaust the air outside, while ductless hoods use charcoal filters to clean the air before recirculating it. The maintenance procedure, including cleaning and replacement, is the same for all types of cooker hoods and filters. Although the stainless-steel filters on the outside rarely require replacement, the activated carbon filters in the fan assembly must be replaced every 6 to 12 months.
Over time, the cooker hood filter can become clogged and need to be replaced to ensure that it continues to work effectively. Replacing the filters in your cooker hood is a simple task that can be done by anyone with basic DIY skills. In this blog, we will guide you through the process of replacing the filters in your cooker hood. Before we get started, make sure that you have the right replacement filters for your cooker hood. You can usually find the model number of your cooker hood on the manufacturer’s website or in the user manual.
Step 1: Turn off the cooker hood
Before you start replacing the filters, make sure to turn off the cooker hood. This will prevent any accidents or injuries while you are working on it.
Step 2: Locate the filters
Most cooker hoods have filters located either at the bottom or the top of the unit. The filters may be held in place by clips or screws, so you will need to locate these first.
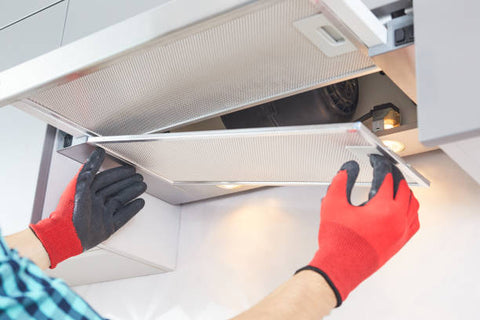
Step 3: Remove the old filters
Once you have located the filters, remove them from the cooker hood. This may involve releasing clips, unscrewing screws, or simply lifting the filters out. Make sure to keep track of any screws or clips that you remove, as you will need to put these back in place when you install the new filters.
Step 4: Clean the filter housing
Once the old filters have been removed, take a moment to clean the filter housing. Use a damp cloth to wipe down the surface and remove any built-up grease or dirt. This will help to ensure that the new filters are properly secured and that they work effectively.
Step 5: Install the new filters
Next, install the new filters into the cooker hood. Make sure to follow the manufacturer’s instructions for installing the filters. Once the filters are in place, check that they are securely fitted and that there are no gaps around the edges.
Step 6: Reassemble the cooker hood
Once the filters have been installed, reassemble the cooker hood by putting back any screws or clips that you removed earlier. Make sure that everything is securely in place before turning on the cooker hood.
Step 7: Test the cooker hood
Finally, turn on the cooker hood and run it for a few minutes to make sure that it is working properly. Check that the new filters are removing smoke, grease, and cooking odors effectively.
In conclusion, replacing the filters in your cooker hood is a simple task that can be done by anyone with basic DIY skills. By following these steps, you can ensure that your cooker hood continues to work effectively, keeping your kitchen air clean and fresh. It is important to replace the filters regularly to maintain the performance of your cooker hood, so make sure to check and replace the filters on a regular basis.


